Feeds:
Posts
Comments

Posts Tagged ‘Japanese’

This was made at the end of a weekend where all the previous recipes we’d tried hadn’t quite come together, or worked as we’d hoped, so our expectations were low. What a relief: we were blown away with the flavour, and our enthusiasm returned with a vengeance! The recipe is by Jamie Oliver but inspired by the Japanese restaurant Nobu in London who are known for their black cod miso and for good reason. The recipe is simple but you need to start 24 hours in advance.

Wine Suggestion: This is a dish jam packed full of savoury umami flavours and needs a similarly umami loaded wine to match. We started with a small glass of Hidalgo La Gitana’s Pasada Pastrana, a single vineyard aged manzanilla which was excellent. Then we segued into savoury Grenache territory with Roc des Ange’s Segna da Cor from the wilds of Roussillon; vibrantly textured and almost sucking the stones it was grown on. What a way to end the weekend.

Black Cod Miso- serves 4

  • 4 bulbs of pak choi, quartered
  • 1 cucumber, peeled halved and deseeded, then sliced into long 1cm thick strips
  • juice of 1 lime
  • soy sauce
  • cooked sticky rice (to serve)

FOR THE MARINADE:

  • 2 stems of lemongrass
  • 1 red chilli, deseeded and chopped
  • 2.5cm piece of fresh ginger, peeled and chopped
  • 200ml of sake or white wine
  • 2 tbsp runny honey
  • 300g miso paste
  • 4 x 200g cod steaks, skin-on and pin-boned

Start the marinade the day before. Remove the outer layer from the lemongrass stems and discard. Bash the lemongrass with the back of a knife, then finely chop. Put the lemongrass into a pestle and mortar with the chilli, ginger and a pinch of salt, then bash to a paste.

Put the paste into a saucepan with the sake and honey, then bring to the boil. While the mixture is warming, gradually add the miso paste, a little at a time, stirring constantly. Simmer until the mixture is lightly golden, then remove from the heat and pour onto a flat tray so it cools quickly.

When the marinade is cool, put the fish into a container and pour over three-quarters of the marinade. Move the fish fillets around to ensure they are completely coated, then cover and put into the fridge. Put the rest of the marinade into a container and keep in the fridge until needed.

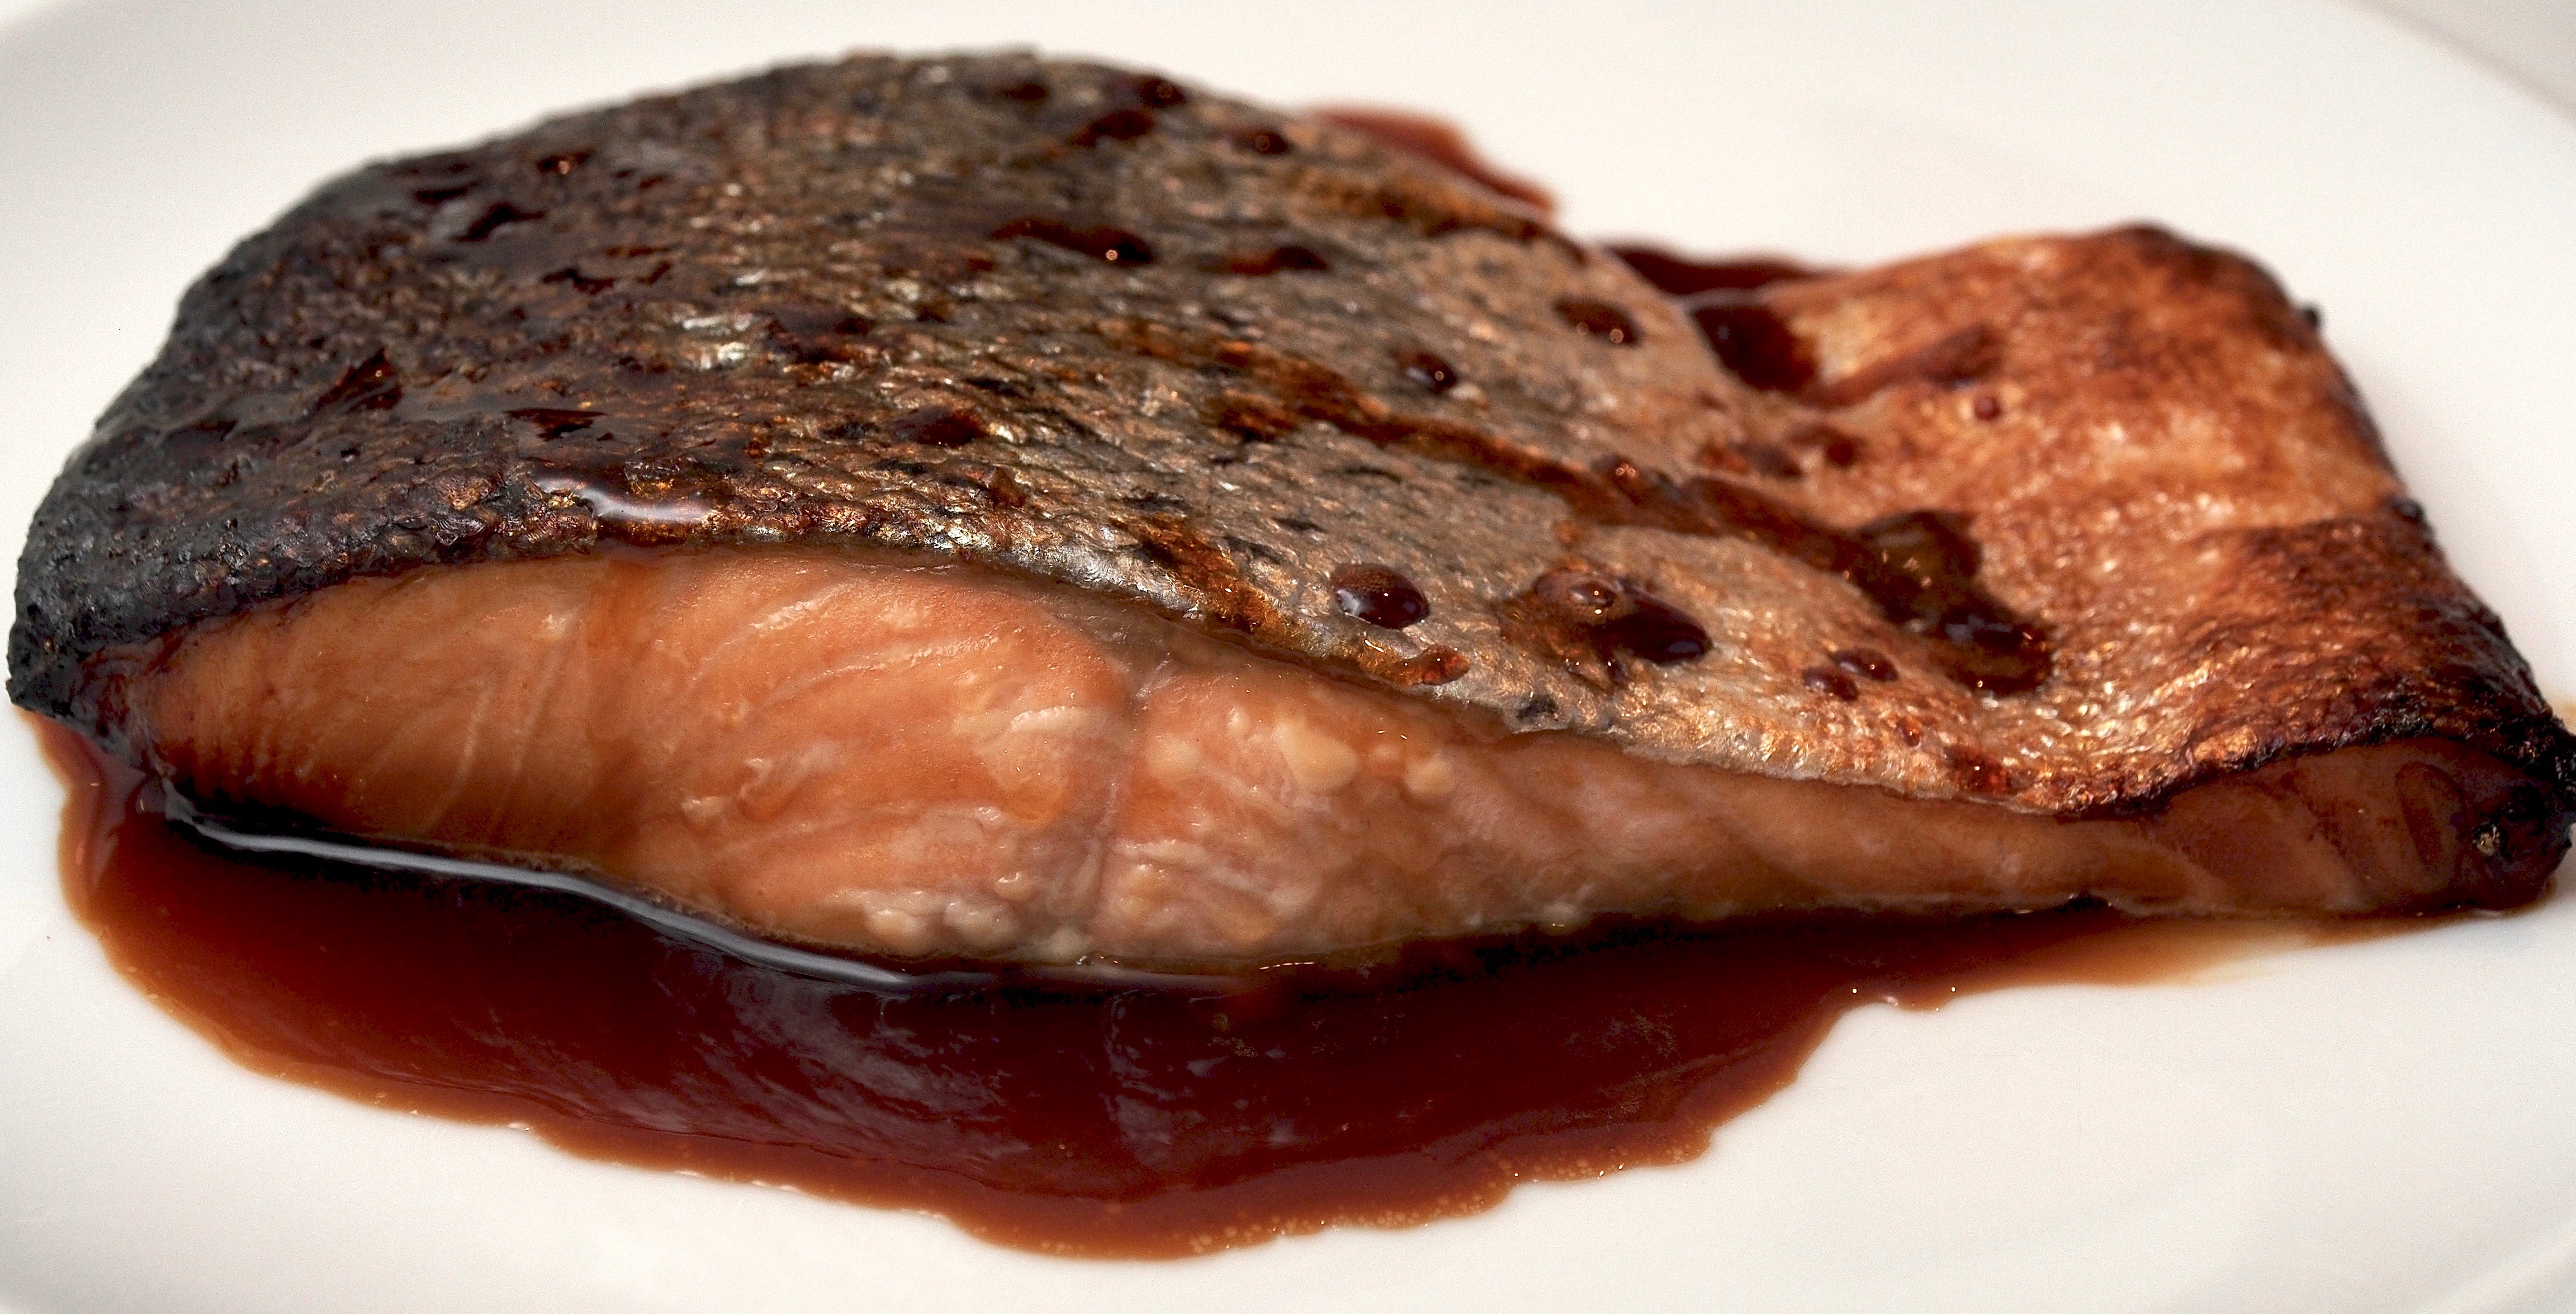
When ready to cook, preheat the grill until very hot. Put the pieces of fish onto an oiled baking tray, skin-side up and cook until slightly caramelized and golden. This will take 6-8 minutes depending on how thick your pieces of fish are.

Meanwhile, lay the pak choi into a steamer over a pan of boiling water. Add the strips of cucumber and steam until the pak choi is tender.

Stir the lime juice into the container of leftover marinade to loosen it slightly. Serve the fish with the greens and drizzle over a little soy sauce. Serve with cooked rice and the miso dressing on the side.

(Original recipe from Cook with Jamie by Jamie Oliver, Penguin Books, 2006.)

Advertisement

Read Full Post »

Our daughter is a gyoza addict and luckily we have a good local Japanese restaurant. She would order three or more portions if we let her. So in order to avoid bankruptcy we’ve decided to start making them ourselves. They are actually very straightforward, and helped immensely by shop-bought gyoza wrappers and a little gyoza folding gadget.

The wrappers keep in the freezer and defrost in an hour at room temperature. Just put them in the fridge afterwards until you’re ready to make the gyoza.

Chicken & Shiitake Gyoza with Miso Lemon Dipping Sauce – makes about 30 gyoza

  • 300g chicken thigh fillets, quartered
  • 10 shiitake mushrooms, finely chopped
  • 8 water chestnuts, finely choped
  • 3 tsp light soy sauce
  • 2 tsp finely chopped ginger
  • 1 tsp sake or mirin
  • 6 scallions, finely chopped
  • 1 tbsp cornflour
  • 30 gyoza wrappers
  • 1 tbsp sesame oil

FOR THE DIPPING SAUCE

  • 2 tbsp pale miso
  • 2 tbsp lemon juice
  • 2 tsp caster sugar
  • 1 tbsp maple syrup
  • 2 tsp toasted sesame seeds

Pulse the chicken thighs in a food processor until minced, then tip into a bowl.

Add the mushrooms, water chestnuts, soy sauce, ginger, sake/mirin, scallions and cornflour. Season with salt and plenty of black pepper, then mix together well with a metal spoon. You can leave the mixture in the fridge until you’re ready to cook.

Mix together the ingredients for the dipping sauce and set aside.

Line a large tray with non-stick baking paper and have a bowl of water handy.

Put a gyoza wrapper into your gyoza maker, floured side down, and put 1 tbsp of the filling in the middle (you can and should use a piping bag for this). Dip your finger in the water and lightly run it round the edge of the wrapper. Close the gyoza maker and squeeze tight to seal. If you don’t have a little machine, you can look up how to fold them on youtube.

Heat a large frying pan with a lid over a medium high heat. Add ½ tbsp sesame oil, then place the gyozas into the pan, you will probably have to do 2 batches. Leave them for about 2 minutes or until the bottoms have turned golden, then add 40ml water and cover with a lid. Cook for another 2 minutes until most of the water has evaporated, then remove the lid. Drizzle over another ½ tsp of sesame oil and allow to crisp up for about 30 seconds.

Remove from the pan and serve with the dipping sauce.

(Original recipe from My Asian Kitchen by Jennifer Joyce, Murdoch Books, 2018.)

Read Full Post »

Sometimes all you want is a plate of greens. Here they are with a Japanese-style sauce and some sticky rice and sesame seeds. 

Wine Suggestion: We find this combination of flavours in the sauce work well with Riesling, especially if it’s the lighter styles with a touch of fruit. This could be a German Kabinett with lower alcohol, residual sugar and refreshing acidity, or one of the dry Clare Valley cuvées that leave a hint of sugar in making them very approachable in youth like Pike’s Hills & Valleys. 

Greens with Sticky Sesame Rice – serves 2

  • 1 tbsp caster sugar
  • 140g sushi rice
  • 1 tbsp sesame seeds, toasted
  • 1 tsp sesame oil
  • 1 tbsp sunflower oil
  • 350g purple sprouting broccoli or other long-stemmed broccoli
  • 6 scallions, halved lengthways

FOR THE SAUCE: 

  • 2 tbsp brown miso paste
  • 1 tbsp mirin
  • 1 tbsp rice wine vinegar
  • 1 tbsp soft brown sugar
  • 2 tsp finely grated ginger
  • 1 red chilli, deseeded and diced

Stir the sauce ingredients together with 1 tbsp water, then set aside.

Bring a large pan of water to the boil with the caster sugar and ½ tsp salt. Add the rice and boil for about 15 minutes (or whatever time it suggests on the pack) until just cooked. Drain well, return to the pan and sprinkle over the toasted sesame seeds and sesame oil. Cover and keep warm. 

Heat the sunflower oil in a wok until smoking hot. Add the broccoli and stir-fry for a few minutes until almost tender, add a splash of water now and then to create a bit of steam. Add the scallions and stir-fry for 30 seconds, then stir in the sauce and cook for another minute or two, stirring constantly. 

Divide the rice between 2 plates and top with the stir-fry. 

(Original recipe from BBC Good Food)

Read Full Post »

Salmon Teriyaki

Really delicious salmon with crispy skin and a rich sauce. Serve with rice and some asian greens.

Wine Suggestion: Soy sauce accentuates tannins in wine so we’d suggest avoiding reds for this dish. With ingredients that include Sake, Mirin/Sherry and sugar there are two options that we find work really well, and in a contrasting way. Firstly a non-dry, slightly sweet Oloroso sherry, like the Valdespino 1842 VOS Oloroso, will work with the umami savoury characters and compliment the rich sweetness. Alternately play with a bit of contrast and pick a good Rosé Champagne, like Billecart-Salmon’s benchmark example; this plays with the senses and adds an extra vibrancy to a dish already replete with flavour.

Salmon Teriyaki – serves 4

  • 250ml light soy sauce
  • 125ml sake or rice wine
  • 125ml mirin or dry sherry
  • 100g caster sugar
  • 4 salmon fillets, skin-on
  • 1 tbsp sunflower oil

Mix the first 4 ingredients together and stir until the sugar has dissolved to make a teriyaki sauce. Marinade the salmon in half of the sauce for at least 3 hours. Pour the rest of the sauce into a saucepan and bubble gently on a low heat for 30 minutes or until reduced and thickened.

Heat the oven to as high as it goes, then put the drained salmon fillets in an ovenproof dish, skin upwards. Cut small squares of foil to cover the salmon skin and stop it burning.

Bake for 5-6 minutes, then remove the foil and brush oil over the skin. Return to the oven for another 5-6 minutes or until the skin is crispy and starting to char.

Pour some of the reduced sauce onto each plate and sit the salmon on top to serve.

(Original recipe by Reiko Hashimoto-Lamber IN: BBC Good Food Magazine, April 2008.)

Read Full Post »

Healthy Japanese-style aubergines – this is really easy and has loads of flavour! Great when you feel like a veggie night.

Miso aubergines – to serve 2

  • 2 small aubergines, halved lengthways
  • olive oil
  • 2 tbsp miso paste
  • 2 tbsp mirin
  • a large pinch of caster sugar
  • 1 tbsp lemon juice
  • 1 tbsp sesame seeds
  • 4 scallions, shredded to serve
  • rocket to serve

Heat the oven to 200C/fan 180c/gas 6. Score a criss-cross pattern into each aubergine half. Brush with 1tsp oil and season. Put on a non-stick tray and bake for 20 minutes (or a bit longer if they are not completely soft).

Mix the miso, mirin, sugar and lemon juice together to make a paste. Spread over the aubergine halves and sprinkle with the sesame seeds. Put under a hot grill for a few minutes until golden. Serve with the scallions and rocket.

Beer Suggestion: Miso is a strong flavour so you need something robust and yeasty. Try a richer style beer, such as Bombardier, or Kirin for a cleaner, lager style.

(Original recipe from BBC Good Food)

Read Full Post »

Easy Sushi Hand Rolls

We have shied away from sushi recipes up until now as they tend to be a bit intimidating with all that delicate rolling and slicing. These hand rolls are really easy and by the time you’ve made 14 of them you will have perfected the skill!

Sushi hand rolls (temaki) – makes 14

  • 7 sheets nori

FILLINGS (your choice of …)

  • 150g salmon or tuna, cut into strips
  • ½ an avocado, peeled and cut into strips
  • ¼cucumber, seeds removed and cut into strips
  • 150g cooked, peeled prawns
  • 2 scallions, finely chopped

RICE

  • 250g sushi rice
  • 50ml Japanese rice vinegar
  • 40g golden caster sugar
  • 1 tsp salt

SPICY CHILLI MAYONNAISE

  • 6 tbsp mayonnaise
  • 2-3 tbsp chilli garlic sauce
  • ½ lemon, juiced
TO SERVE
  • soy sauce
  • wasabi
  • pickled ginger

To make the rice, put it in a sieve and wash in cold running water until the water runs clear. Drain for about 30 minutes to rid of excess water.

Put the rice into a saucepan, add 250ml cold water and bring to the boil on a high heat. Cover tightly and simmer on a low heat for 30 minutes. Take off the heat and leave covered to steam for 15 minutes.

Meanwhile, put the rice vinegar, sugar and 1tsp salt in a saucepan. Heat the mixture until the sugar dissolves, then cool to room temperature.

Put the hot rice in a large bowl and add ¼of the sushi rice seasoning. Fold gently and repeat until all of the seasoning is mixed through. Cool the rice by fanning it for 5 minutes (this makes it shine).

To make the mayonnaise, mix all the ingredients together, taste and add extra salt and lemon if necessary.

Now you are ready to make your sushi hand rolls. Use the fillings in different combinations and serve with pickled ginger, soy sauce and wasabi.

  1. Lay a sheet of nori shiny side down and cut horizontally in half to make 2 strips. Cut a diagonal corner piece from the right hand side of each strip.
  2. Put one strip in your palm, keeping the shiny side down.
  3. With a damp hand, take a ping-pong sized ball of rice and spread it over half the nori on the side closest to your thumb.
  4. Make a diagonal trough in the middle of the rice with your finger to make a space for your filling.
  5. Add a little drizzle of spicy mayonnaise along the trough (a squeezy bottle makes this easier).
  6. Add your choice of filling – though not too much or you won’t be able to roll it.
  7. Start rolling the nori from the rice-covered part by creating a triangle. You can practice this with an empty sheet before beginning. Bring the bottom corner up to enclose the filling.
  8. Keep rolling until the nori forms a cone – make sure it is rolled tight.
  9. Use a tiny ball of wasabi as glue to seal the join of your cone at the top. Repeat 14 times!

Wine Suggestion: Go for something delicate and light with some floral and fruit aromas. A dry Riesling worked well for us.

(Original recipe from BBC Good Food)

Read Full Post »

I’m sure we’ve already mentioned that we panic-buy skinless, boneless chicken thighs – though they do seem to be easier to get these days. Thighs are much tastier than chicken breasts and don’t have the same tendency to dry out.

After a relatively sunny day on Sunday we deicided to plan a barbecue for Monday. Jono ended up standing outside in the rain under a big umbrella – that’s summer in Ireland! Do try barbecuing lemon halves – it makes them super juicy and a bit milder, perfect squeezed over grilled meat or fish.

Teryyaki mustard chicken – to serve 4

  • 8 boneless chicken thigh fillets – the skin can be on or off
  • vegetable oil, for brushing
For the teriyaki sauce
  • 3 tbsp beer
  • 3 tbsp Japanese soy sauce
  • 1 tbsp caster sugar
  • 1 tsp mustard powder
  • lemon halves, for serving
Combine the teriyaki sauce ingredients in a small bowl and stir until the sugar dissolves.

Put the chicken in a flat, non-metallic dish and pour over the marinade. Cover and refrigerate for no more than 3 hours, turning now and again. Take it out of the fridge 20 minutes before cooking.

Light the barbecue. Brush the grill with a little vegetable oil to stop the chicken sticking. Put the chicken thighs on the grill, reserving the marinade, and cook for about 5 minutes, turn and cook for another 3 minutes.

Start basting with the teriyaki sauce and turning every minute – for about 4 minutes or until the thighs start to look charred at the edges.

Check they are cooked through and remove them to a plate, cover and rest for 5 minutes before serving.

Serve with barbecued lemon halves to squeeze over.

(Original recipe by Ross Dobson for Sainsbury’s Magazine, August 2009)

Read Full Post »